
How to Build a WordPress Website (Beginner Step-by-Step Guide)
If you’re looking for a beginner WordPress guide, this step-by-step tutorial will show you exactly how to build your first website — from buying a domain to setting up hosting, WordPress, DNS and business email.
I’ll walk you through the exact setup I’m using on this site, so you can follow along and get online properly without wasting time, money or getting stuck.
🧩 Step 1 — Buy a Domain Name
A domain name is your website address (like yourwebsite.co.uk).
👉 What to do:
- Go to a domain provider (I used IONOS)
- Search for your domain name
- Choose:
.co.uk(for UK sites)- or
.com(global audience)
- Buy the domain
💡 Tips:
- Keep it short and easy to remember
- Avoid numbers and hyphens
- Try to match your brand name
🧩 Step 2 — Choose Hosting
Hosting is what actually puts your website on the internet.
👉 Without hosting, your website doesn’t exist online.
👉 What I use:
WPX Hosting — fast, reliable and beginner-friendly
Why I chose WPX:
- Very fast loading speeds
- Simple dashboard
- Great support (important when you’re new)
- Easy WordPress setup
🧩 Step 3 — Connect Your Domain to Hosting
This is where most beginners get confused — but I’ll keep it simple.
👉 What you’re doing:
You’re telling your domain:
👉 “My website lives over there (on WPX)”
👉 How to do it:
- Log into your domain provider (IONOS)
- Find DNS settings
- Change nameservers to WPX nameservers
WPX will give you something like:
ns1.wpx.net
ns2.wpx.net
ns3.wpx.net
- Save changes
⏱️ Important:
This is called DNS propagation (basically: internet updating itself)
This can take 5 minutes to 24 hours to update
🧩 Step 4 — Install & Manage WordPress (WPX Control Panel)
At this stage, your domain is connected — now we’re going to install and manage WordPress properly.
👉 Step 4.1 — Open your WPX Control Panel
Go to your WPX dashboard and find your website.
Below is what you’ll see:

👉 Click “Control Panel” on your domain (this is where everything is managed)
👉 Step 4.2 — Click to install WordPress
Once inside the control panel, you’ll see your site listed like this:
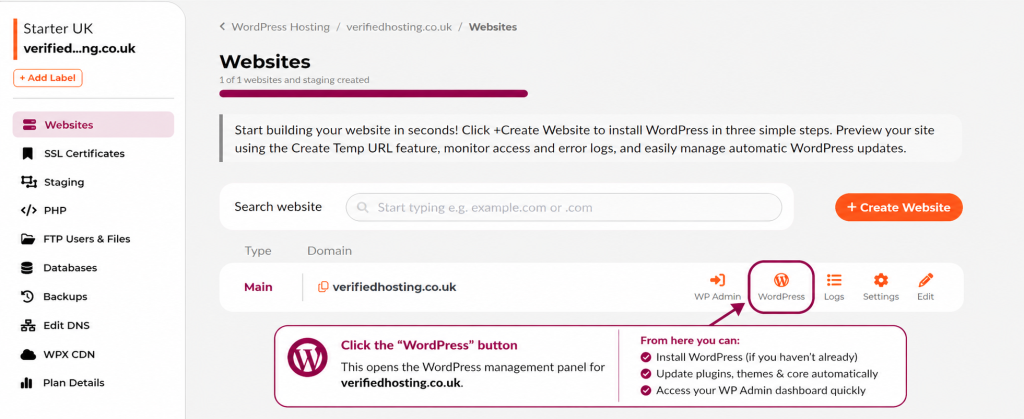
👉 Click the “WordPress” button
This opens your WordPress management area.
👉 Step 4.3 — Manage Your WordPress Updates in WPX
After clicking “WordPress”, you’ll see this:
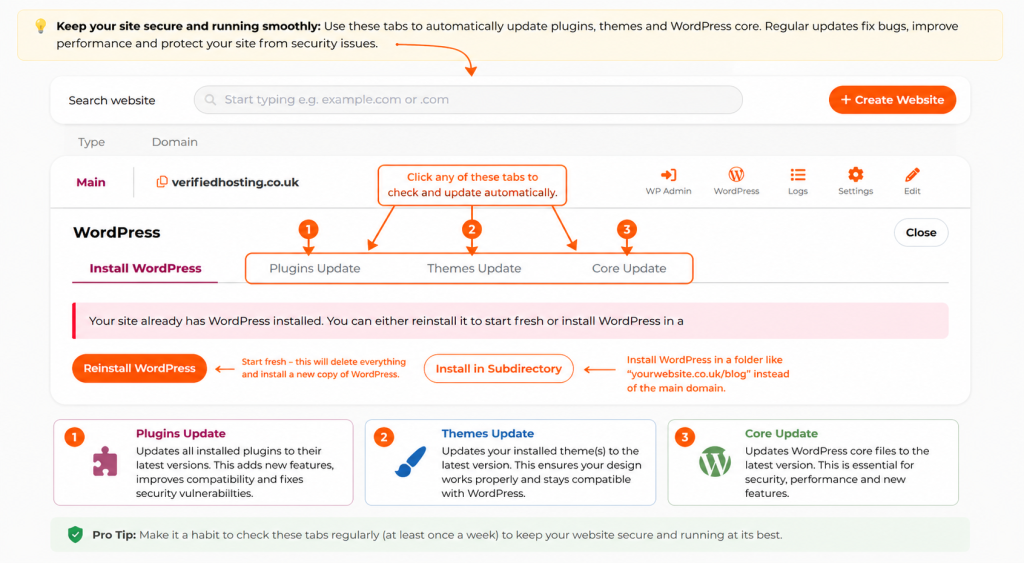
🔥 What this page lets you do:
✅ Update Plugins
Plugins = tools that add features to your site
👉 Keep these updated for:
- Security
- Speed
- Compatibility
✅ Update Themes
Themes = your website design
👉 Updates fix bugs and improve performance
✅ Update Core
Core = the main WordPress system
👉 Always keep this updated — it’s critical for security
⚠️ Important Section Explained
If you already have WordPress installed this message will appear:
“Your site already has WordPress installed…”
🔄 Reinstall WordPress
👉 This resets your site completely
👉 Use this if:
- You want to start fresh
- You’ve broken something
📁 Install in Subdirectory (IMPORTANT)
This is where beginners get confused.
👉 What it means:
Instead of:
yourwebsite.co.uk
It installs WordPress on:
yourwebsite.co.uk/blog
👉 When would you use this?
- If you want a blog separate from your main site
- If you’re testing something
- If you’re building a second version
❌ For you (right now):
👉 DO NOT use this
You want your site on:
yourwebsite.co.uk
🎯 What you should do now
👉 If WordPress is NOT installed yet:
Click Install WordPress
Follow the setup steps (site name, username, password, email)
Wait 1–2 minutes while it installs
👉 Once installation is complete:
Click WP Admin
Log into your site using the details you just created
You’ll now be inside your WordPress dashboard
👉 From here, you can:
Create pages
Change your design (theme)
Add plugins (features)
Start building your website
💡 Pro Tip
Bookmark this link:
yourwebsite.co.uk/wp-admin
👉 This is your control centre — you’ll use this every time you work on your site
🔥 Why this step matters
Most beginners either:
❌ Don’t know where to log in
❌ Install WordPress but never access the dashboard properly
❌ Skip updates and break things later
Now you:
✅ Know how to install WordPress properly
✅ Know exactly where to log in
✅ Understand where to manage everything
✅ Are set up the right way from the start
🚀 NEXT STEP
👉 Now you’re ready for:
Step 5 — Setting up your website properly (theme, plugins, layout)
🧩 Step 5 — Basic WordPress Setup (Do This Immediately)
Once you log into WP Admin, don’t start designing yet.
👉 Set the foundations first.
⚙️ 1. Change your site name & tagline
Go to:
Settings → General
Set:
- Site Title: Verified Hosting (or your brand name)
- Tagline: Short description of what your site does
👉 This shows in Google and browser tabs
🏠 2. Set your homepage properly
Go to:
Settings → Reading
- Select: A static page
- Homepage: choose your homepage
👉 This makes your site look like a real website (not a blog feed)
🔗 3. Fix your URLs (VERY important)
Go to:
Settings → Permalinks
Select:
Post name
👉 This makes your URLs clean:
❌ yourwebsite.co.uk/?p=123
✅ yourwebsite.co.uk/start-here
🔐 4. Set up security (Wordfence)
Go to:
Plugins → Add New
Search:
Wordfence Security
Install + Activate
👉 Then:
- Run the setup wizard
- Enable firewall
- Enable login protection
💡 This protects your site from hackers and login attacks
📊 5. Set up Google tracking (Site Kit)
Search plugin:
Site Kit by Google
Install + Activate
👉 Then:
- Connect your Google account
- Enable:
- Google Analytics (traffic)
- Search Console (SEO)
- PageSpeed Insights (performance)
💡 This shows you:
- How many people visit your site
- What they search on Google
- How fast your site is
🔁 6. Set up redirects (prevents broken links)
Search plugin:
Redirection
Install + Activate
👉 Then:
- Go to Tools → Redirection
- Run setup
- Enable automatic 404 tracking
💡 This means:
If a page breaks or URL changes → users won’t hit dead pages
🧠 7. Install essential plugins
Go to:
Plugins → Add New
Install these:
🔎 Rank Math SEO
- Helps you rank on Google
- Lets you set keywords + meta descriptions
📝 WPForms
- Create contact forms easily
💾 UpdraftPlus
- Automatic backups
- Save to Google Drive (recommended)
⚡ LiteSpeed Cache (or WPX cache if using WPX)
👉 IMPORTANT:
If you’re using WPX hosting, use:
- WPX Cache (built-in)
- Or WP Rocket (premium)
❌ Don’t use LiteSpeed on WPX (wrong server type)
🚀 8. Delete junk plugins
Go to:
Plugins → Installed Plugins
Delete:
- Hello Dolly
- Anything you don’t recognise
👉 Keeps your site fast and clean
🔥 Why this step matters
Most beginners:
❌ Skip security
❌ Don’t track traffic
❌ Use messy URLs
❌ Install random plugins
Now you:
✅ Have a secure website
✅ Can track visitors
✅ Have clean SEO-friendly URLs
✅ Have backups (CRITICAL)
✅ Avoid beginner mistakes
💡 Real talk
This step isn’t “optional setup” — it’s your foundation.
Get this right, and everything after becomes easy.
🧩 Step 6 — Set Up Business Email with Google Workspace
Google Workspace lets you create a professional email address like:
yourname@yourwebsite.co.uk
This looks far more professional than using a normal Gmail address.
Example:
info@verifiedhosting.co.uk
What you are doing here
You are telling your domain:
“Send my emails through Google Workspace.”
To do that, you need to add a few DNS records inside WPX DNS.
DNS records are basically instructions for your domain.
Step 6.1 — Open Google Workspace
Go to:
admin.google.com
Log in with your Google Workspace admin account.
Then go to:
Apps → Google Workspace → Gmail
Google will guide you through activating Gmail for your domain.
Step 6.2 — Verify your domain
Google first needs to check that you actually own the domain.
It will give you a TXT verification record.
It usually looks something like this:
google-site-verification=abc123examplecode
Step 6.3 — Add the Google verification TXT record in WPX
Go to:
WPX Dashboard → Your Website → Edit DNS
Create a new record:
Type: TXT
Host: @
Value: google-site-verification=your-google-code
TTL: default
Then go back to Google Workspace and click Verify.
If it does not verify instantly, wait 5–30 minutes and try again.
Step 6.4 — Add Google MX records
MX records control where your emails are delivered.
To use Gmail, remove any old WPX/mail MX records and add Google’s MX records.
In WPX DNS, add these:
Type: MX
Host: @
Priority: 1
Value: ASPMX.L.GOOGLE.COM
Type: MX
Host: @
Priority: 5
Value: ALT1.ASPMX.L.GOOGLE.COM
Type: MX
Host: @
Priority: 5
Value: ALT2.ASPMX.L.GOOGLE.COM
Type: MX
Host: @
Priority: 10
Value: ALT3.ASPMX.L.GOOGLE.COM
Type: MX
Host: @
Priority: 10
Value: ALT4.ASPMX.L.GOOGLE.COM
After this, go back to Google Workspace and click Activate Gmail.
Step 6.5 — Keep the correct website records in WPX DNS
Do not delete your website records.
You usually need to keep:
A records for @
A records for www
TXT record for Google verification
MX records for Google Workspace
SPF record for Google
You can usually keep:
ftp A record
That is used for file access and does not affect Gmail.
Step 6.6 — Remove old WPX email records if using Google Workspace
If you are using Google Workspace for email, remove old WPX email-related records like:
mail A record
autodiscover A record
dkim._domainkey CNAME pointing to dkim.wpx.net
old WPX MX records
These are for WPX email, not Google Workspace.
You want one clean email system: Google Workspace.
Step 6.7 — Add SPF record
SPF tells the internet who is allowed to send email from your domain.
In WPX DNS, add or replace your SPF record with:
Type: TXT
Host: @
Value: v=spf1 include:_spf.google.com ~all
TTL: default
Important:
You should only have one SPF record for the domain.
If you already have another SPF record, replace it with the Google one above.
Step 6.8 — Set up DKIM
DKIM helps prove that your emails are genuinely from your domain.
This helps stop your emails going to spam.
In Google Admin Console, go to:
Apps → Google Workspace → Gmail → Authenticate email
Select your domain.
Choose:
DKIM key length: 2048
Then click:
Generate new record
Google will give you:
Host / DNS name
Usually something like:
google._domainkey
And a long TXT value starting with:
v=DKIM1; k=rsa; p=
Step 6.9 — Add the DKIM record in WPX
Go back to WPX DNS and create a new TXT record:
Type: TXT
Host: google._domainkey
Value: paste the full DKIM value from Google
TTL: default
Make sure you paste the full value. Do not shorten it.
Then return to Google Admin Console and click:
Start authentication
If it fails, wait 15–30 minutes and try again.
Final DNS checklist for Google Workspace
Your WPX DNS should include:
A records for website
A records for www
TXT Google verification record
5 Google MX records
1 SPF TXT record
1 DKIM TXT record
Optional:
ftp A record
Remove if using Google email only:
mail A record
autodiscover A record
WPX DKIM CNAME
old WPX MX records
extra SPF records
Why this step matters
Without this setup:
Emails may not arrive
Emails may go to spam
Google may not verify your domain
Your business email may look unprofessional
With it done properly:
Your email works through Gmail
Your domain looks professional
Your emails are more trusted
You reduce spam problems
Once this is complete, you’ll be able to send and receive email from:
yourname@yourwebsite.co.uk
🔒 🧩 Step 8 — Set Up FREE SSL (HTTPS) with WPX
🎯 What this does
An SSL certificate makes your website secure:
http://yourwebsite.co.uk ❌
https://yourwebsite.co.uk ✅
👉 That little 🔒 padlock in the browser = trust + security
🚀 Step-by-step
1. Go to your WPX dashboard
- Click your website
- Go to:
SSL Certificates (left sidebar)
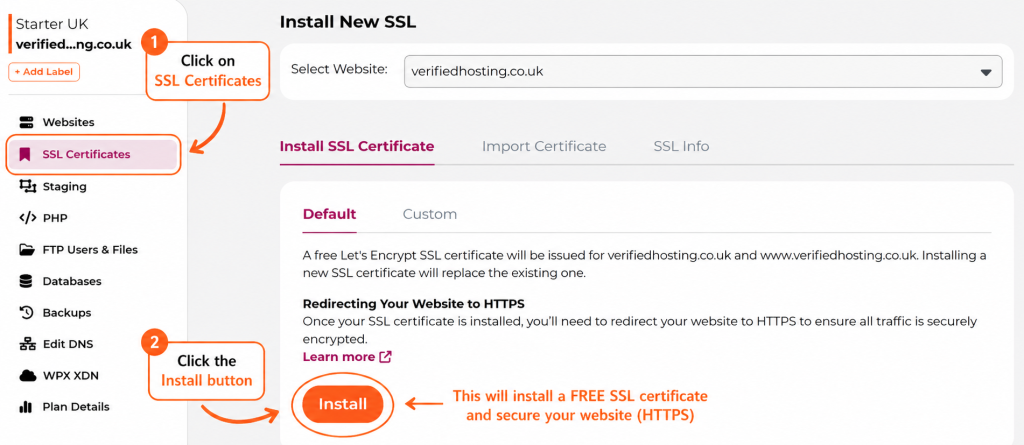
2. Click “Install SSL Certificate”
You’ll see exactly what’s in your screenshot 👇
👉 Leave it on:
Default (Let’s Encrypt SSL)
This is:
- ✅ FREE
- ✅ Automatic
- ✅ Perfect for 99% of sites
3. Click “Install”
👉 That orange Install button at the bottom
WPX will:
- Generate the certificate
- Apply it to your domain
- Secure both:
- yourdomain.co.uk
- www.yourdomain.co.uk
⏱️ Takes about 30–60 seconds
⚠️ IMPORTANT — Redirect to HTTPS
This is the part people miss.
Your site might still load on:
http://
You need to force it to:
https://
👉 Do this in WordPress:
Install plugin:
Really Simple SSL
Then:
- Activate it
- Click Activate SSL
👉 Done — it auto redirects everything to HTTPS
🔥 Why this step matters
Without SSL:
- ❌ Browser shows “Not Secure”
- ❌ People won’t trust your site
- ❌ Worse Google rankings
With SSL:
- ✅ Secure connection
- ✅ Better SEO
- ✅ Looks professional
- ✅ Required for forms, logins, payments
💡 Pro tip
After installing SSL, test your site:
https://yourwebsite.co.uk
👉 Make sure:
- Padlock shows
- No “Not Secure” warning
🧠 Simple way to think about it
SSL = locking your website
Without it → anyone can peek
With it → everything is encrypted (scrambled so no one can read it)
🧩 Step 9 — Avoid These Beginner Mistakes
Most people mess up here 👇
❌ Choosing cheap hosting
👉 Slow site = bad rankings
❌ Skipping DNS setup
👉 Causes email + website issues
❌ Not setting up business email
👉 Looks unprofessional
❌ Overcomplicating WordPress
👉 Keep it simple at the start
🧩 My Current Setup
This is exactly what I’m using:
- Domain: verifiedhosting.co.uk — IONOS
- Hosting: WPX
- Email: Google Workspace
- Website: WordPress
🟢 FINAL WORD
If you want to follow the exact setup I use, you can get started here:
🟡 DISCLAIMER
Some links may be affiliate links. I only recommend tools I use and trust.
🧠 WHAT YOU’VE JUST BUILT
You now have:
- A real website
- Proper hosting
- Business email
- Full control
👉 Most people never get this far — you have.